Dock cleats are one of the essential hardware for every boat owner. They are nothing but a way of tying up one’s vessel safely and securely. A weekend boater would benefit from understanding how to install a dock cleat to avoid accidents, protect his or her boat, and have far easier docking procedures with good docking.
This step-by-step guide covers everything—from selecting the correct cleat and hardware to installing it on various dock types. If done correctly, your cleats will hold firmly and securely and remain mooring-ready for years.
Why is Dock Cleat Installation Important?
Dock cleats are not pieces of mere metal anymore; they are the load points wherein the full force of your moored boat meets the tides, waves, and wind. Incorrectly installed cleats with the wrong fastener would give way when put under pressure and damage your boat and dock.
Boats consider cleats fastened without backing plates or by a bolt of too small a diameter, one of the major reasons for mooring failures. Properly installed, the cleat would be adamant about giving way, dragging your mind away every single time you secure the vessel.
Choosing the Right Dock Cleat and Hardware
Types of Dock Cleats
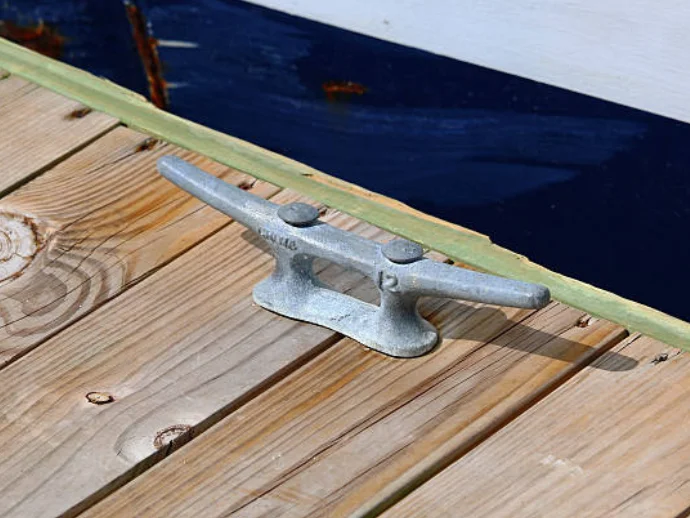
There are many styles of dock cleats, each serving different purposes:
- Standard Horn Cleats
These are the most common types designed for routine use.
- Flip-up Cleats
Retractable ones, so that on a time-walking surface, they can evade trip hazards.
- Pop-Up or Solar Cleats
Innovative designs are configured with lighting and are finished elegantly.
Choosing the Right Materials
Choose cleats made of aluminum, galvanized steel, or marine-grade stainless steel. Stainless steel gives the highest corrosion resistance and durability, ideal for use in saltwater settings. Galvanized steel is another option: it features good strength at a cheap price but will eventually rust. Aluminum, on the other hand, is attractive and light but does not fare well under loads.
Bolts and Fasteners
Use stainless steel through-bolts with locking nuts for the best installation, particularly on wooden docks. Tapcon screws or concrete anchors are better for concrete surfaces. Never use regular screws since they tend to work loose and are not rated for such loads.
Tools and Materials You’ll Need
Before bespeaking the procedure for installing a dock cleat, have the following tools and materials on hand:
- Marine-grade dock cleats (size depends on the boat; generally 6 to 10 inches)
- Stainless steel bolts, washers, and locking nuts
- Backing plate (stainless steel or marine plywood)
- Power drill (hammer drill if mounting on concrete)
- Drill bits (wood or masonry, depending on the dock type)
- Adjustable wrench or socket set
- Tape measure and pencil
- Thread locker (e.g., blue Loctite)
How to Install a Dock Cleat?
Step 1: Plan the Cleat Location
Begin by selecting a place for the cleat. It should be set so that the bow, stern, or spring lines may be naturally stretched when tied up to the dock.
Keep enough distance—typically 10 to 15 feet—between the cleats. Avoid placing the cleats too close to the edge of the dock, as the edge may split or break.
Step 2: Mark and Drill the Pilot Holes
Insert a cleat into the site where it is to be installed and trace the positions of the bolt holes with a pencil. Double-check with a tape measure to ensure the holes are appropriately spaced and aligned. For wooden docks, drill your pilot holes straight through the decking and into the underlying timber support frame. Meanwhile, make the pilot hole by using a masonry bit and hammer drill for concrete docks to the needed depth.
Step 3: Set the Backing Plate or Washers
To strengthen the space underneath the dock, use a backing plate composed of stainless steel or thick marine plywood. The backing plate spreads the load and prevents the bolts from pulling through the dock surface. If you opt for washers, go with big-diameter stainless washers to ensure good stability.
Step 4: Install the Cleat
Insert the bolts through the cleat and the dock surface. Attach the washers and nuts (or backing plate, if used) below. Apply a thread locker to prevent loosening caused by vibration or frequent use, then thread the nuts and at least begin to tighten.
Step 5: Tighten and Check
Wrench any nuts until it feels snug and give it another half-turn. Don’t overtighten it because it will crush the wood or destroy the cleat. Assuring that the cleat is now locked in position nicely, make an inspection to assure it is sitting flush with the dock without a wobble. Congratulations! You have just learned the right way of installing a dock cleat.
Installation Variations by Dock Type
- Wooden Docks
Ideal for through-bolts. Always attach cleats through the dock’s structural frame, not just the decking. Use a backing plate for support.
- Concrete Docks or Seawalls
A hammer drill easily drills through the concrete. Using Tapcon masonry screws or anchors, fasten the cleats in place. Use stainless steel hardware to prevent corrosion from setting in due to moisture penetration.
- Composite or Metal Docks
Machine bolts can be used through holes in the dock’s structural metal and reinforced with non-corrosive washers and plates. Double-check the manufacturer’s instructions to ensure everything is correct.
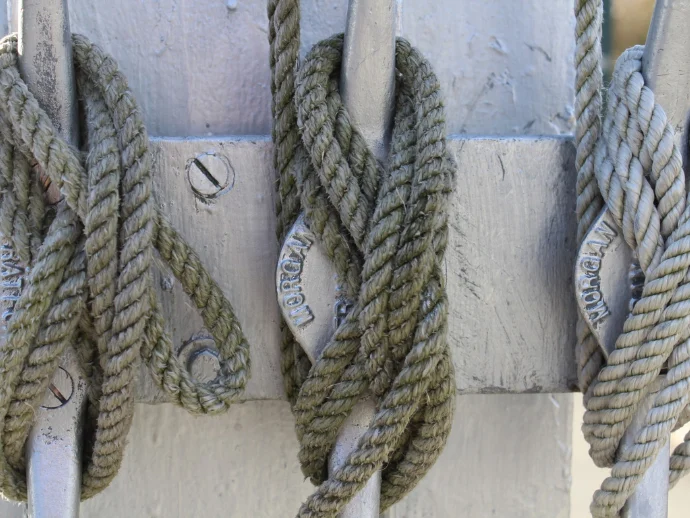
How to Tie Your Boat to a Cleat?
Installing the cleat is half the battle; learning to use it is a matter of technique.
- The boat is held in place in part by the cleat hitch.
- Secure the rope surrounding the cleat base.
- While making a figure-8 pattern, loop the line over the horns.
- One locking loop (half hitch) goes under one horn.
Keep the line tidy and avoid excess slack, trip hazards, or snags. When correctly applied, this technique prevents chafing and ensures the boat’s stability in rough waters.
Post-Installation Tips and Maintenance
- Inspect regularly: At the beginning and end of the boating season, inspect the dock cleats for rust, torn-off bolts, or problems with the dock surface.
- Retighten bolts: Even with thread lockers, waves and foot traffic vibrations can loosen hardware. Use a wrench to retighten the bolts whenever needed, gently.
- Check for wood deterioration: Inspect for rot, cracking, or splintering of wood near the base of the cleat, particularly on wood docks. Replace or shore up bad areas as soon as possible.
- Inspect concrete or metal docks: If the cleat is anchored on concrete or metal, look for water accumulation, hairline cracks, or compromised anchor points that can affect the cleat’s grip.
- Keep clean with fresh water: Clean any salt residue with fresh water after each use, particularly when working in saltwater environments, as salt can accelerate corrosion.
- Anti-corrosive spray: To extend the life of the cleats and hardware, marine-grade corrosion inhibitors are sprayed occasionally.
- Check after storms: Examine the cleats after strong winds, heavy rain, or intense boat activity to make sure they have not shifted or gotten loose from being under tension.
- Replace compromised bolts: Do not neglect rusty bolts or cracked cleats; replace them at once with marine-grade stainless steel parts.
- Keep tie-off lines tidy: Keep dock lines neatly coiled about the cleat to prevent any tangling or tripping hazards, making the cleat area clean and secure.
Conclusion
Knowing how to install a dock cleat will ensure the secure mooring of your boat and the ultimate protection of your dock. Using the right type of cleat, the right tools, and the correct installation method will give you hardware that lasts forever in any condition.
Don’t skimp on materials of marine grade, along with through-bolting, which will land you a good payoff every time you go to tie up. Whether replacing an old dock or constructing one from scratch, a sturdy cleat is one of the wisest boating investments you can make.


